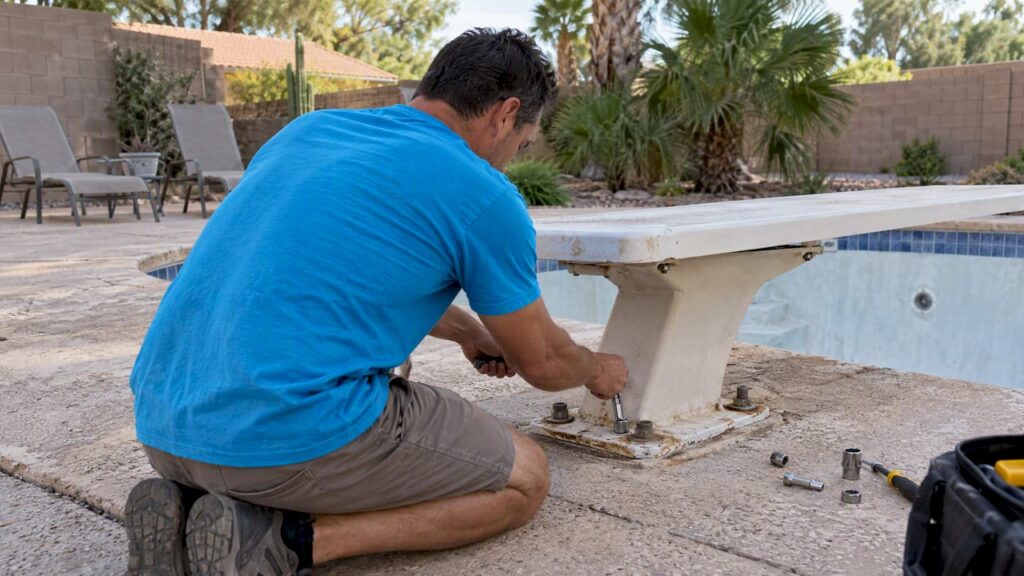
Yes, most homeowners or pros can remove a residential diving board safely: take the board off first, then unbolt the base using penetrating oil and the correct sockets, and only cut fasteners flush as a last resort. Stop and call a licensed professional the moment you see bonding wires, electrical junction boxes, or anchors that run into the structural slab. For jobs beyond basic hardware, a specialist like We Fix Ugly Pools® can take over safely.
TL;DR:
- Bonding wires and electrical junction boxes attached to the diving board must never be cut or disconnected to avoid electrical hazards.
- Using the correct sockets, penetrating oil, and patience is key for removing seized hardware without damaging the deck or tile.
- Cutting the anchor flush with a grinder is only appropriate if bolts refuse to turn after oil and effort, and electrical wires or rebar indicate the need for professional help.
- Patching or capping the anchor holes properly depends on the deck surface; leaving open sleeves invites water damage and safety hazards.
- Most removal jobs are manageable by homeowners with proper tools and caution, but safety checks on bonding are critical to prevent future electrical risks.
Table of Contents
- What to Check Before You Start: Bonding, Electrical, and Permits
- Tools and Materials You Will Need
- Step-by-Step: Removing the Board, Then the Base
- If the Bolts Won’t Budge: Extraction, Cutting, and Knowing When to Stop
- Capping or Patching Anchor Holes After Removal
- Should You Remove It for the Season, or Store It?
- What We See in the Field When Homeowners Hire a Pro
- Our Take: Most Removals Don’t Need to Be a Crisis
- How We Can Help With Removal, Repair, or a Full Remodel
- FAQ
- Sources
What to Check Before You Start: Bonding, Electrical, and Permits
Before you touch a wrench, walk the deck and look for what you cannot see once you start working. Metal diving-board bases are often tied into the pool’s equipment with bonding conductors, thick copper wires that connect metal components around the pool to reduce the risk of voltage differences between them. Equipotential bonding is about electrical safety, not power delivery, and the IAEI’s explanation of bonding requirements makes clear that homeowners should never cut or disconnect a bonded conductor attached to a diving-board assembly. If you spot a wire clamped to the baseplate or a junction box nearby, stop and bring in an electrician or pool contractor.

Local building rules matter too. Some jurisdictions treat a diving board’s anchor slab as part of the structural pool deck, while others classify it as an accessory you can remove without a permit. Our pool diving board safety rules guide walks through the compliance questions worth asking your municipality first.
Before starting, run through this checklist:
- Photograph the board, base, and surrounding deck from several angles for your records.
- Put on safety glasses, gloves, and closed-toe boots rated for grinding work.
- Keep a fire extinguisher nearby if you expect to grind or cut metal.
- Clear the pool area of people and cover the water to catch debris.
- Confirm there is no visible bonding wire or junction box within reach of your tools.
Pro Tip: Take a photo of the bonding grid (if visible) before removal so a licensed electrician has a clear reference if reconnection is ever needed.
Tools and Materials You Will Need
Gathering the right tools before you start saves hours of frustration and reduces the chance of rounding off a bolt head or damaging the deck. A seized anchor bolt rarely responds to brute force, it responds to the right socket, patience, and penetrating oil.
Here is what to have on hand:
- A socket set with metric and standard sizes, plus a breaker bar for extra leverage.
- Penetrating oil such as a standard shop-grade formula, applied well before you attempt removal.
- A manual impact driver for stubborn fasteners that resist a ratchet.
- Left-handed drill bits and bolt extractors for bolts that shear off below the surface.
- An angle grinder with a thin cut-off wheel and a thicker grinding wheel for finishing flush cuts.
- Polymer-modified mortar or epoxy plugs for patching anchor holes once the base is out.
- Stainless steel caps or plugs if you plan to leave the sleeve in place for a future board.
- Drop cloths, a fire extinguisher, and a shop vacuum for cleanup around the pool edge.
Skip adjustable wrenches wherever possible. They tend to slip and round off bolt heads, turning a simple job into a drilling-and-extraction project. If your plan includes resurfacing the deck afterward, it is worth reviewing material options now so the patch and the final finish match.
Step-by-Step: Removing the Board, Then the Base
Work through this project in order: board off, base exposed, anchors out. Rushing the sequence is how people end up with a cracked tile or a snapped bolt.
- Document the site. Photograph the board, hardware, and surrounding deck before you move anything, and clear the area of people and pets.
- Remove deck-mounted hardware first. Loosen the bolts that secure the board to its base plate, working from one end to the other so the board does not shift unexpectedly.
- Lift the board as a team. Fiberglass and aluminum boards are lighter than they look but awkward to carry alone. Use two people for anything longer than six feet, and set it down on a padded surface away from foot traffic.
- Expose the anchor hardware. With the board clear, brush away debris and old caulking around the base plate so you can see every fastener.
- Apply penetrating oil and wait. Soak each anchor bolt and let the oil work for at least 15 minutes, longer if the hardware shows heavy rust.
- Remove anchors with the correct socket and breaker bar. Turn steadily rather than jerking the bar; a sudden twist is what snaps a corroded bolt.
- Cut flush only if a bolt will not turn. Use a thin cut-off wheel first, then a thicker grinding wheel to finish the surface smooth, keeping the grinder angled away from the pool water and tile.
- Protect the pool and finishes during cutting. Lay a drop cloth over nearby tile and keep a cover on the water to catch sparks and metal fragments.
- Cover open holes temporarily. Tape or plug exposed sleeves right away so nothing falls in or traps water before you patch permanently.
A homeowner account of this exact process recommends penetrating oil and correctly sized sockets as the first line of defense against seized fasteners, and specifically warns against adjustable wrenches because they round off bolt heads and make the job harder, not easier.
Pro Tip: Work in the cooler part of the day. Metal anchors expand slightly in direct sun, which makes a borderline-seized bolt even tighter.
If the Bolts Won’t Budge: Extraction, Cutting, and Knowing When to Stop
Seized anchor bolts are the most common reason a straightforward removal turns into an afternoon-long ordeal. The fix is almost always patience before power tools.
Start with another round of penetrating oil and give it real time to soak in, sometimes overnight for heavily corroded hardware. Follow with a manual impact driver or breaker bar rather than a power drill, since sudden torque is what snaps bolts at the worst possible moment. If a bolt shears off below the surface, a left-handed drill bit paired with a bolt extractor can often back it out without damaging the surrounding slab.
When extraction fails, cutting the stud flush with a grinder is the practical next step. A homeowner account of this method describes using a thin cut-off wheel to remove the bulk of the stud, then switching to a thicker grinding wheel to finish the surface level with the deck. It works, but it throws sparks and hot metal fragments, so clear the area, wear a respirator, and keep a fire extinguisher within reach.
Watch for these red flags that mean it’s time to call a professional:
- A visible bonding clip or wire attached to the anchor you’re trying to remove.
- Anchors that appear to run directly into the structural slab rather than a separate accessory sleeve.
- Any sign the grinder is cutting into rebar instead of just the fastener.
- A bolt that will not budge even after multiple oil-and-wait cycles.
Modern building codes have tightened clearance and depth requirements for diving structures, which is one of the biggest reasons older boards get removed in the first place rather than reinstalled. The UpCodes residential pool chapter lays out the clearance rules worth checking before you decide whether a board can go back in later.
Capping or Patching Anchor Holes After Removal

An open anchor sleeve left in a pool deck is an invitation for trouble. Water collects in the hollow, freezes and expands in cold climates, and corrodes whatever metal is left behind. Left uncapped, a sharp stud or an exposed hole is also a simple trip hazard for anyone walking the deck barefoot.
The right patch depends on the surface:
- Concrete decks: A polymer-modified mortar bonds well and can be floated to match the surrounding texture.
- Paver decks: Remove and replace the affected paver rather than patching around it, so the joint lines stay consistent.
- Tile decks: An epoxy plug seals the hole without staining the surrounding grout, and can be color-matched afterward.
- Sleeves kept for future use: A stainless steel cap keeps water out without permanently closing the option to reinstall.
Whatever material you choose, keep the surrounding slope intact so water still drains toward the pool’s deck drains instead of pooling where the board used to stand. If the patch area is larger than the anchor itself, perhaps because concrete cracked during removal, that’s a sign to bring in a professional for resurfacing rather than a DIY patch. Our deck replacement guide covers material compatibility in more depth if you’re planning a broader deck refresh. Take photos of the finished patch work too. They’re useful if you ever need to show a municipal inspector or a future buyer what was done and why.
Should You Remove It for the Season, or Store It?
Not every diving board needs to come off the pool for winter. The decision comes down to condition, climate, and how the board has been maintained, not a blanket seasonal rule.
If the board shows cracking, delamination, or rust at the base, remove it permanently rather than storing it for another season. A board that’s structurally sound, by contrast, can often stay secured in place through winter if properly covered. Pool-industry guidance is genuinely split here: some voices recommend pulling every accessory before freezing weather, while others point out that a sound board can be left installed with the right protection, and that contractors may carry liability if they reinstall a board that no longer meets current clearance standards. The SwimmingPoolSteve guide to closing mistakes lays out that disagreement clearly and is worth reading before you decide.
If you do remove the board for storage:
- Clean and fully dry the board before storing it, since trapped moisture encourages mold on fiberglass boards.
- Support it flat or on padded brackets, never leaned against a wall where it can warp.
- Bag and label all hardware so you’re not hunting for the right bolt next spring.
- Store it somewhere temperature-stable, away from direct sun that can fade or warp the surface.
Pro Tip: Label stored hardware by location on the base plate, not just by size. Reinstallation goes faster when every bolt knows where it belongs.
For a broader seasonal checklist beyond the diving board itself, our pool winterization guide covers the rest of the closing process.
What We See in the Field When Homeowners Hire a Pro
After years of pool remodeling and repair work, we’ve developed a clear sense of when full removal makes more sense than a temporary fix. A board with surface rust but a sound structure often just needs new hardware and a bonding check. A board with a cracked base plate or anchors that have started pulling away from the slab is a removal candidate, full stop, regardless of the season.
When we take on a removal, the scope typically includes:
- Safe extraction of the board and base without damaging surrounding tile or coping.
- Controlled cutting of seized anchors with proper spark and debris containment.
- Deck patching that matches the existing surface and preserves drainage.
- Responsible disposal of the old hardware and board.
- Photographic documentation of the finished work for your records.
Homeowners considering a DIY approach should weigh the bonding and electrical risks seriously. Our guide to improper pool service risks outlines what can go wrong when removal or reinstallation work skips the safety basics.
Our Take: Most Removals Don’t Need to Be a Crisis
The biggest misconception we run into is that every diving board is a ticking liability that has to come off immediately. In reality, the bigger risk isn’t the board itself, it’s rushing the anchor removal with the wrong tools, or skipping the bonding check because the board “looks fine.”
Conventional advice tends to treat removal as either trivial (just unbolt it) or terrifying (call a demolition crew). Neither is accurate. Most jobs sit in the middle: a homeowner with the right sockets and some patience can handle a sound board with accessible anchors. The real judgment call is condition, not a season on the calendar.
If we had to prioritize one thing, it’s the bonding check. Skipping it is the single most common way a simple hardware job turns into an electrical hazard. Everything else, penetrating oil, breaker bars, patch material, is reversible if you get it wrong. A disturbed bonding grid is not something to discover after the fact.
— Brian
How We Can Help With Removal, Repair, or a Full Remodel
If a diving board removal has you staring at a cracked anchor plate or a deck patch that needs to match decades-old tile, we handle that kind of work regularly. We bring the sockets, the extraction tools, and the patching materials to complete the job.

Relevant services include:
- Bolt and anchor extraction, including seized or broken hardware.
- Deck patching and resurfacing to match existing finishes.
- Concrete pool repair for cracked or deteriorated anchor slabs.
- Remodel options if the removal is part of a bigger pool refresh.
If you’d rather not deal with a grinder and a fire extinguisher on your own deck, request an estimate through our pool repair services page and we’ll scope the job properly before anyone touches a bolt.
FAQ
How much does it cost to remove a diving board?
Published pricing for diving board removal is not publicly listed, since cost depends heavily on bolt condition, deck material, and whether patching or resurfacing is needed. For an accurate number on your specific pool, request an estimate rather than relying on a generic figure.
Why did diving boards become less common at homes and public pools?
Tighter building codes raised the minimum depth and clearance requirements for safe diving, and many older residential pools simply don’t meet those standards anymore. The NYTimes guide to diving notes that safe springboard diving generally calls for pools at least 12 feet deep, a depth most backyard pools were never built to.
Why are diving boards disappearing from newer pools?
Insurance liability and updated clearance rules are the main drivers, since a board that doesn’t meet current code can expose a pool owner or installer to real risk if someone is injured. Builders increasingly skip diving boards altogether on new residential projects for that reason.
How often should a diving board be replaced?
There’s no fixed replacement interval. Inspect the board and base hardware each season for cracking, rust, or looseness, and replace it when you see structural wear rather than on a set schedule.
What should I do with the old diving board after removal?
Check with your local waste authority on large-item disposal, since fiberglass and metal boards often can’t go in standard curbside pickup. If you’re having a professional handle the removal, responsible disposal is typically included in that scope of work.
Sources
- Taking the Mystery Out of Equipotential Bonding Requirements for Swimming Pools – IAEI Magazine
- Common Pool Closing Mistakes Part 2 — SwimmingPoolSteve
- Chapter 42 Swimming Pools: GSA Residential Code 2024 | UpCodes
- Embrace the Joy of Diving — NYTimes