If your pool is losing noticeably more water than evaporation accounts for, a bucket test is the fastest way to rule that out. Plumbing leaks get confirmed by isolating pressure and suction lines and comparing how fast the water drops with the pump on versus off. Professionals add acoustic listening, pressure testing, and tracer gas when the loss hides underground.
TL;DR:
- Losing more than 0.25 inches of water per day typically indicates a leak rather than evaporation, especially if loss is faster with the pump running.
- The bucket test, performed over 24 hours, helps distinguish between leaks and evaporation by comparing water level drops inside and outside the bucket.
- Leak-prone areas include skimmer and return fittings, equipment valves, pump housings, light niches, and shell or liner cracks.
- DIY detection methods like dye tests and inspecting visible plumbing are effective for surface issues but fall short with underground leaks, which require professional tools.
- Professional leak detection costs range from about $150 for basic inspection to over $1,000 for complex underground diagnostics, with detection fees often credited toward repairs.
Table of Contents
- Quick checks: signs of a leak and the bucket test
- Where leaks usually occur: fittings, equipment, shell, and liners
- DIY detection methods homeowners can use safely
- Professional detection methods: pressure testing, acoustic, and tracer gas
- What to expect from a professional visit and typical costs
- Common repair options for plumbing leaks and realistic outcomes
- Prevention and monitoring: routine checks and sensors to catch leaks early
- Why a specialist pool remodeler matters when leaks keep coming back
- When DIY testing is enough, and when to call a professional
- How We Fix Ugly Pools® handles leak detection and repair
- FAQ
- Sources
Quick checks: signs of a leak and the bucket test
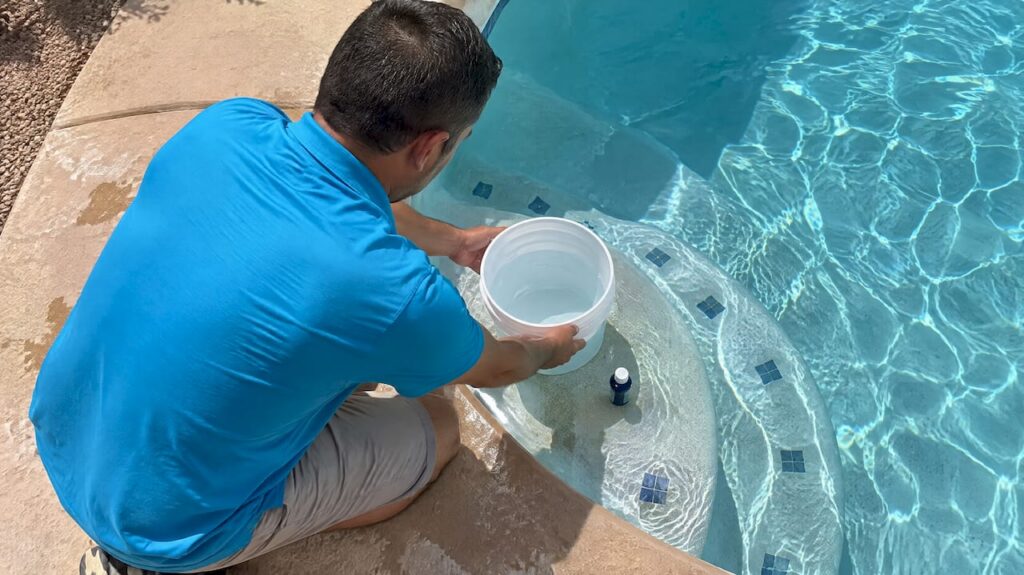
Before calling anyone, we recommend running the numbers yourself. A simple bucket test tells you whether you’re dealing with evaporation or an actual leak, and it costs nothing but twenty-four hours of patience.
- Fill a bucket with pool water and place it on a step so the water levels inside and outside the bucket match.
- Mark both water lines with tape or a marker.
- Wait 24 hours, then compare how far each line dropped.
If the pool’s water line drops faster than the bucket’s, you’ve got a leak, not evaporation. According to municipal guidance from Mesa, losing more than 0.25 inches of water per day often points to a leak rather than normal weather loss.
Common visible signs to watch for: wet soil or soggy patches near equipment pads, bubbles coming from return jets, an autofill valve that runs more often than it used to, and water loss that seems to accelerate overnight. Running the bucket test with the pump on, then again with it off, separates plumbing issues from shell problems: faster loss while the pump runs usually points to a pressure-side line, while faster loss with the pump off suggests a suction-side leak or a shell defect, per the same Mesa pool leak guidance.
Pro Tip: Turn off your autofill valve for a day or two before testing. Automatic fill systems mask steady water loss by topping the pool back up before you notice anything wrong.
Where leaks usually occur: fittings, equipment, shell, and liners
Leaks don’t happen randomly. They cluster around predictable stress points, which is why we always start inspections in the same places.
- Skimmer and return fittings: these flex with ground movement and are the most common failure point on older plumbing.
- Unions and valves at the equipment pad: rubber gaskets dry out and crack, especially in hot climates with heavy sun exposure.
- Pump and filter housings: o-rings and seals wear down and leave small puddles that look minor but add up fast.
- Light niches and drain fittings: these penetrate the shell and rely on seals that degrade over years of chemical exposure.
- Shell cracks (concrete/gunite pools) or liner tears (vinyl pools): structural issues that often need a different repair approach entirely.
If wet spots appear near the equipment pad, start there. If the loss seems tied to a specific jet or light, that’s your next stop before assuming the worst.
DIY detection methods homeowners can use safely
Plenty of diagnostic work can happen before you pick up the phone, and doing it yourself first often saves money on the service call.
- Run the bucket test first, timing it over a full 24 hours and noting weather conditions, since wind and heat both speed up evaporation.
- Try a dye test at suspected fittings: with the pump off, squirt a small amount of dye (or food coloring) near skimmers, returns, and light niches, and watch for it getting pulled into a crack or gap.
- Inspect visible plumbing around the equipment pad for damp unions, cracked valves, or mineral staining that suggests a slow weep.
- Consider a basic pressure-test kit only if you’re comfortable isolating lines safely. These kits cap off sections of pipe and pump in air to watch for pressure drop, but overpressurizing old or brittle PVC can crack it further.
Our honest take: DIY testing is great for narrowing down obvious, visible problems. It gets risky once you’re dealing with underground lines, light niches, or anything requiring you to cut into plumbing. At that point, a professional’s tools cost less than a mistake.
Professional detection methods: pressure testing, acoustic, and tracer gas
Once DIY narrows things down, technicians bring tools that can confirm a diagnosis without guesswork.
- Line isolation and pressure testing: each plumbing line gets capped and pressurized individually. A drop in pressure confirms which specific line is leaking, rather than just “somewhere in the plumbing.”
- Acoustic and electronic listening: sensitive microphones pick up the sound of water escaping under pressure, which can localize a leak without digging, as long as the pipe isn’t buried under insulating material that muffles sound.
- Tracer gas: when acoustic methods fail, a mix of 5% hydrogen and 95% nitrogen gets introduced into the line. Hydrogen’s small molecules escape through tiny cracks and rise to the surface, where a probe detects them, according to Esders’ explanation of tracer gas detection. This method is considered an industry standard of last resort because it works regardless of temperature or sound transmission, per National Pool Industry News.
- Diver or partial drain inspection: reserved for suspected light niche failures or shell cracks that need a direct visual check below the waterline.
Tracer gas is especially useful when pipes run under screed, insulation, or decking that absorbs sound and makes acoustic equipment unreliable.
What to expect from a professional visit and typical costs
A typical visit follows a set order: reviewing your water-loss history, inspecting equipment, running dye tests, isolating and pressure-testing lines, then moving to electronic detection if needed. Most appointments take one to four hours depending on pool size and plumbing layout, according to cost and process data from Renovate.
| Diagnostic method | Typical cost range |
|---|---|
| Basic visual/dye inspection | About $150 |
| Pressure testing or electronic detection | $300 to $700 |
| Complex underground diagnostics | $500 to $1,000+ |
Many contractors charge detection and repair separately, so it’s worth asking upfront whether that detection fee gets credited toward the repair cost if you hire the same company, per the same cost breakdown. You’ll typically receive a written report and estimate at the end of the visit, which makes comparing multiple quotes much easier.
Common repair options for plumbing leaks and realistic outcomes
Once a leak is confirmed and located, the fix depends on where it is and how bad it’s gotten.
- Quick fixes: epoxy sealants or fitting replacements work for small cracks in accessible unions and valves.
- Permanent fixes: dig-and-replace repairs or partial re-piping are needed when a line has degraded badly or sits in a spot prone to repeat failure.
- Light niche resealing: addresses leaks around light fixtures without requiring a full shell repair.
- Shell crack repair: concrete and gunite pools may need structural patching, while vinyl liners typically get patched or replaced outright.
Ask about warranties or follow-up checks before signing off on any repair, since a proper fix should hold up through at least one full season without a recheck.
Prevention and monitoring: routine checks and sensors to catch leaks early
Catching a leak early almost always costs less than waiting for it to become obvious.
- Check unions, valves, and equipment seals every few months for dampness or mineral buildup.
- Run a bucket test seasonally, especially after extreme heat or freeze cycles that stress fittings.
- Use smart water-level sensors or monitors that flag abnormal drops before you’d notice them visually.
- Grade landscaping away from the pool so a hidden leak surfaces as a wet patch instead of soaking into the ground unnoticed, a principle similar to diagnosing drainage issues around patios.
- Manage autofill settings so you notice unusual water loss instead of letting the system quietly mask it.
Why a specialist pool remodeler matters when leaks keep coming back
Repeated leaks around the same fittings often point to aging plumbing rather than one bad seal. With extensive experience and many pool transformations completed, we’ve seen which repairs hold and which ones come back within a year. Our pool leak signs guide and leak detection and repair page walk through what a thorough visit covers. Always ask for a written report comparing the methods used before approving repair work.

When DIY testing is enough, and when to call a professional
A bucket test and a dye test are safe starting points, and so is tightening an obviously loose fitting you can see. Once you’re dealing with underground lines, light niches, or test results that contradict each other, hand it to someone with pressure-testing equipment. Guessing wrong underground costs more than the service call ever would.
— Brian
How We Fix Ugly Pools® handles leak detection and repair
We built our leak inspection and repair service around giving you a clear answer, not a guessing game. Our team isolates plumbing lines, pressure tests where needed, and walks you through exactly what we find before any repair work starts.

- We provide a written diagnosis and repair estimate after every visit, so you know what you’re approving.
- Detection fees are often credited toward the repair cost when you move forward with us.
- Our background in remodeling means we catch recurring plumbing issues that a repair-only visit might miss.
If your pool’s water loss has you second-guessing evaporation, schedule a leak detection visit and get a straight answer instead of another guess.
FAQ
How much does it cost to have a pool leak detected?
Professional leak detection typically runs from about $150 for a basic visual inspection to $300 to $700 for pressure testing or electronic detection, with complex underground cases reaching $500 to $1,000 or more, according to cost data compiled by Renovate. Many contractors separate the detection fee from the repair cost, so ask whether it’s credited if you proceed with repairs.
What is the most common area for pool leaks?
Skimmer and return fittings tend to fail most often because they flex with ground movement over time, followed closely by unions, valves, and seals at the equipment pad. Light niches and shell cracks are less common but typically require more involved repairs once they do leak.
Why is my pool losing one inch of water a day?
Losing that much water in a day points strongly toward a plumbing or shell leak rather than evaporation, since municipal water conservation guidance considers daily loss over 0.25 inches a likely sign of a leak. A bucket test comparing pump-on and pump-off loss will help confirm whether the source is plumbing or the shell itself.
How do you find pool pipes underground without digging up the yard?
Technicians typically start with acoustic or electronic listening devices that pick up the sound of escaping water through the ground. When pipes run under insulating material or screed that muffles sound, tracer gas, a mix of hydrogen and nitrogen, gets introduced into the line so it can surface through tiny cracks and get detected by a probe, according to Esders’ tracer gas overview.
Sources
- Is Your Pool Leaking? – City of Mesa
- Pool Leak Detection Cost: Average Prices & Repair Costs
- Pool leak detection services (industry overview) – National Pool Industry News