
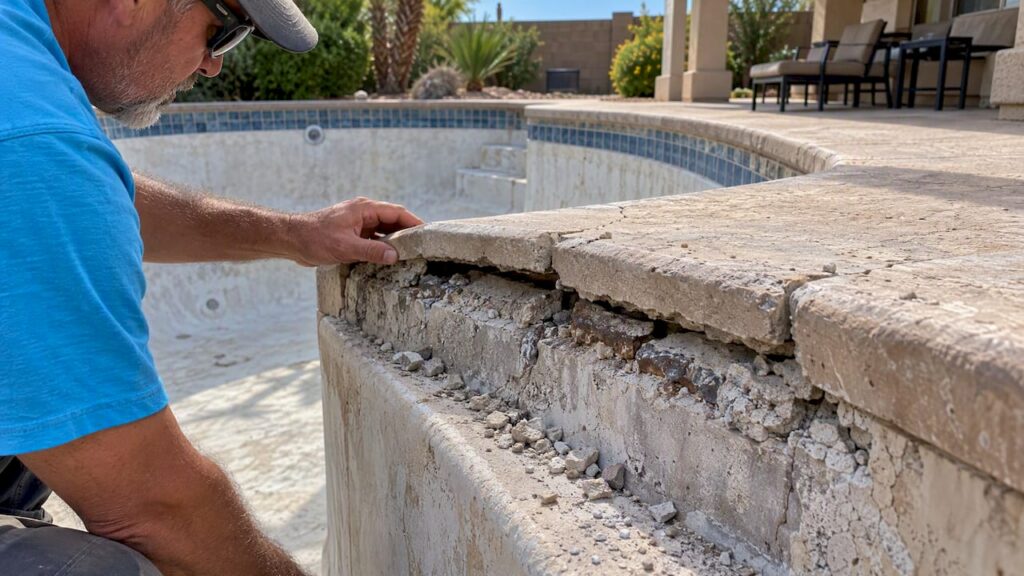
Small surface cracks can often be patched, but long horizontal or offset cracks usually point to a structural bond beam problem that requires exposing the beam, reinforcing it with dowels or rebar, and rebuilding the section. If you spot offset edges, active leakage, or a crack wider than a few millimeters, stop using that area, photograph it for scale, and arrange a professional inspection rather than reaching for a tube of sealant.
TL;DR:
- Horizontal cracks wider than a few millimeters or offset edges indicate a structural issue that needs professional repair, not just sealant.
- Cold joints and old construction methods often weaken the bond beam, increasing the likelihood of cracking due to soil, water pressure, or deck movement.
- Repairs for cracks over 2.5 inches deep or with visible rebar typically require removing decking, epoxy dowels, tying rebar, and pouring new concrete.
- Proper surface preparation and use of flexible expansion joints are critical for a durable repair, preventing deck shove and future cracking.
- Costs generally range from around $75 per linear foot for partial repairs, with full rebuilds taking up to four weeks depending on the scope.
Table of Contents
- What a pool bond beam is and why it matters
- Common causes of bond beam cracks
- Inspecting and diagnosing bond beam damage
- Step-by-step repair approaches: DIY vs professional structural rebuild
- Materials and best-practice techniques
- Typical costs, timeline, and pricing drivers
- When to call a professional or structural engineer
- Lessons from We Fix Ugly Pools®: common pitfalls and how specialists avoid repeat failures
- A practical, risk-aware take on bond beam repairs
- How we can help with bond beam repairs
- FAQ
- Sources
What a pool bond beam is and why it matters
The bond beam is the reinforced concrete band that runs along the top of a pool’s shell, tying the walls together and anchoring the coping and tile above the waterline. It carries more steel and thicker concrete than the rest of the shell because it absorbs soil pressure, deck movement, and the load of coping and decking sitting on top of it. Construction joints where the beam meets older gunite pours, called cold joints, are naturally weaker and tend to be where cracking starts.
- The bond beam anchors coping, tile, and the top course of the pool wall in one continuous band.
- Cold joints from phased construction pours are common starting points for cracks.
- A failed beam can lead to lost coping, popped tile, and eventually shell damage if left unaddressed.
Common causes of bond beam cracks
Most bond beam cracks trace back to one of a handful of culprits, and the crack pattern usually tells you which one you are dealing with. Deck shove, where a concrete deck expands and pushes against the pool shell, is one of the most frequent causes, and it is largely preventable with a proper 1/2-inch expansion joint filled with flexible mastic that lets the deck and coping move independently of the shell. Cold joints and beams that were under-reinforced during construction are another frequent source, especially in older pools. Tree roots, soil settlement, and hydrostatic pressure from a high water table can all stress the beam from below.
- Deck shove shows up as a straight horizontal crack running parallel to the coping line.
- Root intrusion or settlement often produces an offset or stair-step pattern rather than a clean line.
- Hydrostatic pressure tends to appear after heavy rain or a high water table event.
Long, straight horizontal cracks and visible offsets in coping alignment are reliable signs of structural failure rather than cosmetic crazing, according to cost and diagnosis guidance from Angi. Surface crazing, by contrast, is usually a fine web pattern with no offset and no movement when you press on either side of the crack.
Inspecting and diagnosing bond beam damage
A careful inspection before you call anyone saves time and often money, since contractors can quote more accurately when they have real measurements instead of a vague description. Start outside the water wherever possible and treat any crack near standing water or a wet deck as a signal to pause and get professional eyes on it first.
- Stop using the affected area and keep weight off nearby decking until you’ve assessed the crack.
- Measure the crack’s width, length, and any vertical or horizontal offset between the two sides.
- Photograph the crack from directly above with a tape measure or coin in frame for scale.
- Press gently on both sides of the crack to check for movement, and tap nearby concrete with a hammer to listen for a hollow sound that suggests loose or delaminated gunite.
- Look for rust staining, which often means exposed rebar is corroding underneath.
- Gather your photos, measurements, and notes on when the crack appeared before requesting pool crack repair estimates.
Pro Tip: Take photos in good daylight and include a wide shot of the surrounding deck so a contractor can judge whether deck shove is contributing to the problem.
Step-by-step repair approaches: DIY vs professional structural rebuild
Hairline, nonstructural cracks with no offset and no movement are reasonable candidates for a DIY patch using a flexible pool-rated sealant or epoxy filler, though these patches are a cosmetic fix with a limited lifespan rather than a permanent solution. Anything wider, offset, or accompanied by rust staining calls for a structural approach.
A professional rebuild typically follows this sequence:
- Remove the coping and tile around the damaged section.
- Chip back to solid, sound gunite, discarding any loose or hollow material.
- Drill and epoxy dowels into the sound substrate, spaced roughly every 6 to 8 inches, to mechanically tie new concrete to the old.
- Tie in horizontal rebar across the repair span for continuity with the existing steel.
- Form and pour new concrete, or apply shotcrete for larger sections, then allow a full cure.
- Reset the coping and tile, and install a true expansion joint rather than a rigid seam.
- Choose a professional rebuild when the crack exceeds roughly 2.5 to 4 inches in depth or when rebar is visible.
- Choose a professional rebuild when there is any vertical or horizontal offset between the two sides of the crack.
- A patch may be appropriate only for hairline, non-moving surface cracks with no exposed steel.
After any repair, keep an eye on the area for a season, checking after heavy rain or temperature swings, since renewed movement usually means the underlying cause, not just the crack, needs attention.
Materials and best-practice techniques
Surface preparation decides whether a repair lasts years or fails within a season. ACI’s concrete repair guidance frames a durable repair as a full process: assess the actual cause, prepare the surface to sound concrete, choose materials suited to the application, and control quality through installation, rather than simply filling a gap.
- Power wash to a sound substrate before any new material goes on, since bonding to loose or dusty gunite is a common point of failure.
- Use epoxy dowels spaced every 6 to 8 inches, tied into horizontal rebar, for mechanical anchoring on structural repairs.
- Reserve polymer-modified structural repair mortars for partial-depth work; manufacturer data for products in this category show high early compressive strength suited to vertical and partial-depth applications up to about 1.5 inches, per the QUIKRETE Polymer Modified Structural Repair guide.
- Use flexible mastic in the expansion joint between coping and deck, never a rigid mortar, so the two surfaces can move independently.
For repairs under roughly 4 inches thick, added rebar is not always necessary, but clean prep and a high-strength repair mortar remain critical to the bond, per Aquabond’s gunite repair guidance.
Typical costs, timeline, and pricing drivers
Professional bond beam repair, including tile and coping replacement, averages around $75 per linear foot, though your actual quote will move up or down from there depending on the job.
- Deeper cracks that require a full-beam rebuild cost more than a partial, surface-level repair.
- Matching existing tile or coping can add cost, especially on discontinued lines.
- Excavation around the beam, plus any required permits or engineer sign-off, adds both time and expense.
- A small patch can be done in a day or two, a partial rebuild typically runs one to two weeks, and full beam work with proper cure time can take two to four weeks or more.
When to call a professional or structural engineer
Certain signs mean the time for monitoring is over. Offset edges, active leakage, visibly corroding rebar, or coping that has shifted or dropped all call for an inspection, not a wait-and-see approach.
- Request a written scope of work, dated photos of the damage, and an engineered repair plan if the beam shows significant displacement.
- Ask about permits where required and ask for references from similar structural repairs.
- A reputable contractor will outline how they’ll verify the repair afterward, not just that they completed it.
If plumbing lines run near the damaged section, it’s worth having a plumbing specialist check for leaks before the beam is closed back up, since trapped water pressure can mimic or worsen bond beam symptoms.
Lessons from We Fix Ugly Pools®: common pitfalls and how specialists avoid repeat failures
Across many pool transformations, the same shortcuts cause repeat failures: skipping surface prep, skipping dowels, or omitting a true expansion joint between coping and deck. The focus is on correcting the root cause, not just filling the gap, and documenting scope and photos so homeowners know exactly what was addressed.

A practical, risk-aware take on bond beam repairs
We’d rather see a homeowner get a second opinion and document everything than rush into a cheap patch that fails in a year. Structural integrity isn’t the place to cut corners.
— Brian
How we can help with bond beam repairs
If your pool is showing the signs described above, we handle the structural side end to end: concrete and bond beam repair, coping and tile reset, and the inspections that tell you which one you actually need.

- We assess the crack, identify the cause, and give you a clear scope before any work starts.
- We handle coping removal, dowel and rebar reinforcement, and proper expansion joint installation in one project.
If you’re seeing offset cracks, leaks, or shifted coping, reach out through our pool repair services page to request an inspection.
FAQ
What is a bond beam in pool construction?
A bond beam is the reinforced concrete band at the top of a pool’s shell that anchors the coping and tile and ties the pool walls together. It carries extra steel and thickness because it bears deck loads and soil pressure around the pool’s perimeter.
How can I repair structural cracks in my swimming pool?
Structural cracks typically require exposing the damaged section, chipping back to sound gunite, drilling and epoxying dowels every 6 to 8 inches, tying in rebar, and pouring new concrete or shotcrete. Coping and tile are then reset with a proper expansion joint rather than a rigid seam.
How to bond pool rebar?
New rebar is typically tied into existing steel using drilled and epoxied dowels, spaced roughly every 6 to 8 inches, which create a mechanical connection between old and new concrete. This spacing and method come from standard industry repair practice for gunite pools.
What glue to use for pool coping?
Coping is generally set with a bond-rated mortar or adhesive meant for pool applications, while the gap between coping and deck should be filled with a flexible mastic rather than a rigid adhesive. The flexible joint, typically around a 1/2 inch wide, allows the deck and pool shell to move independently and prevents the deck shove that causes many bond beam cracks in the first place.
Sources
- Pool Bond Beam Repair | In The Swim
- Gunite pool bond beam repair (Aquabond)
- Guide to Concrete Repair (ACI preview)
- Understanding the term ‘Swimming Pool Bond Beam’


