Pool mastic replacement is a reasonable weekend DIY job when your joints and the concrete beneath them are sound and not continuously submerged. Hire a pro for structural movement, active leaks, immersion joints, or when you want a warranty. Professionals typically charge $5 to $15 per linear foot. Follow manufacturer data sheets and ASTM joint-design guidance, or call us at We Fix Ugly Pools®.
TL;DR:
- Measure joint width and depth at three or four points; heaving, recurring leaks, or concrete that sounds hollow warrant contractor assessment before resealing.
- Choose exterior polyurethane rated for traffic and horizontal concrete joints; check ASTM C920 classification and product instructions, because periodic immersion may call for priming.
- Clean and dry the joint down to sound concrete, then set backer rod about 25% wider than the gap and sealant depth near half joint width.
- Sealant commonly lasts one to five years, while application may take a day and curing adds 24 to 72 hours or longer.
- For delamination or failed repairs, have a contractor assess the concrete and adhesion, then list removal, preparation, primer, sealant, and warranty in the quote.
Table of Contents
- How do you know your pool mastic is failing?
- Which sealants work for pool deck expansion joints?
- What tools and prep do you need before you start?
- How do you replace pool mastic step by step?
- What does the job cost, and how long does it last?
- When should you call a pool professional?
- Why a conservative call usually wins
- Let us handle the joints and the deck beneath them
- FAQ
- Sources
How do you know your pool mastic is failing?
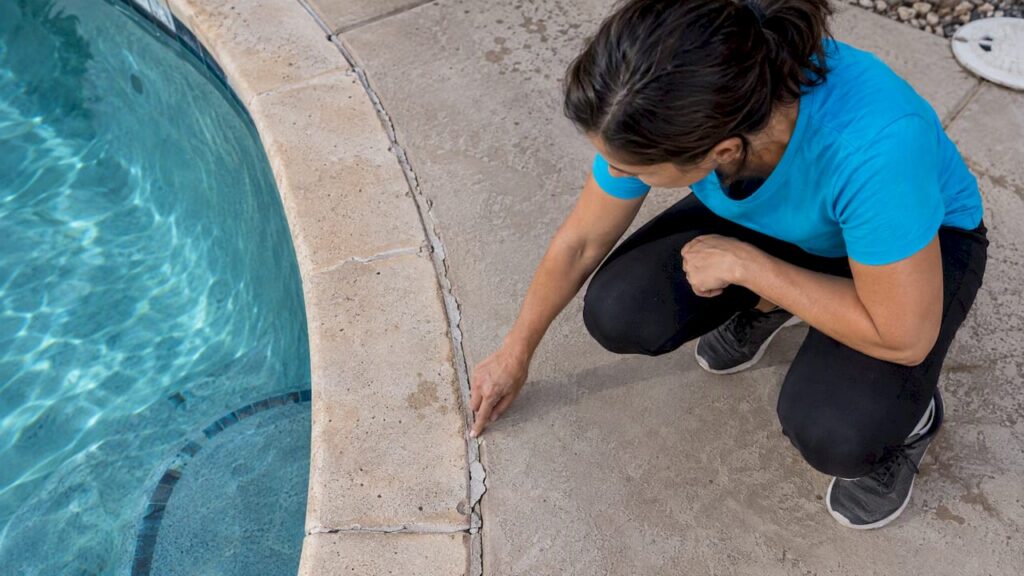
Start with a slow walk around the pool, looking at the joint between the coping and the deck. Most failures show up in plain sight:
- Cracks or splits running along the bead
- Peeling or lifting edges where the mastic has let go of the concrete
- Gaps wide enough to slide a fingernail into
- Loose or shifting coping tiles
- Water pooling in the joint or soaking in beside it
Next, measure. At three or four spots around the pool, note the joint width and depth. Those numbers decide your backer rod size, and multiplying your perimeter by the joint dimensions tells you how much sealant to buy.
Then look for red flags that mean the mastic is only a symptom: a deck that has heaved or sunk, leaks that keep returning after resealing, or hollow-sounding concrete under a tap. Those point to a structural problem, and a contractor should assess them before you open a single tube.
Which sealants work for pool deck expansion joints?
Not every caulk belongs in a pool deck joint. You want a flexible, traffic-rated, exterior-grade product made for horizontal concrete joints. Two categories dominate:
- Self-leveling or semi-self-leveling polyurethane. Vulkem 45SSL is a one-part, moisture-curing, low-modulus polyurethane that is traffic-rated and suited to pool deck expansion joints. Its data sheet says it can often go onto damp or green concrete and frequently bonds without primer.
- Self-leveling polyurethane for horizontal joints. Sikaflex SL 1 is a one-component product that cures with moisture. It usually needs no primer, with one exception: where the joint sees periodic water immersion, Sika recommends Sika Primer-173.
Other self-leveling pool deck sealants exist, so read the label and data sheet of whatever you choose for four things: movement capability, ASTM C920 classification, primer requirements, and cure time. If the joint touches pool water, plan on priming.
The deciding rule: Sikaflex SL 1 calls for a sealant depth of half the joint width, with a backer rod beneath it so the sealant can’t grip the bottom of the joint.
What tools and prep do you need before you start?
Gather these before you open the joint:
- Caulk gun or pour container, depending on the product
- Closed-cell backer rod, sized about 25% wider than the joint
- Scraper or putty knife, plus a grinder or wire brush for stubborn residue
- Rubbing alcohol or the cleaner your sealant maker approves
- Painter’s tape and a shop vacuum
- Sand for texture, if your product’s instructions call for it
Prep is where the job succeeds or fails. Remove old mastic down to sound concrete, clean the joint, and let it dry unless your product is rated for damp concrete. Seat the backer rod at the depth specified by the product data sheet, and prime if the data sheet demands it, and test a small stretch first when you’re trying a new product.
Pro Tip: Don’t puncture the backer rod while seating it. A hole can trap air that bubbles up through the sealant and weakens the seal.

Check the data sheet for the temperature range, too. Applying outside it is a common reason sealant fails early.
How do you replace pool mastic step by step?
- Remove the old mastic. Scrape or grind it out, clear the debris, and clean both joint walls until they are bare concrete or coping.
- Set the backer rod. Choose one about 25% oversize and press it in so the sealant depth lands near half the joint width, a 1:2 ratio. This keeps the sealant bonded to the sidewalls only, so it can stretch instead of tearing.
- Prime where required. Joints that see periodic immersion, or substrates your data sheet flags, get primer. Follow the product’s flash time before moving on.
- Tape the edges. Painter’s tape along the deck and coping keeps your bead tidy and the cleanup quick.
- Apply the sealant. Pour self-leveling products and let them flow, or gun a steady bead of non-leveling ones and tool them smooth per the instructions. Work in sections so nothing skins over before you finish it.
- Finish and cure. Add a sand broadcast if you want texture on a pourable product, pull the tape while the sealant is still workable, and then stay off it. Homeowner guides call for at least 24 hours of cure before use, though your product’s data sheet is the final word.
A practical homeowner guide notes that most deck-crack and mastic issues are repairable by a handy owner with the right materials and clean, dry surfaces. Patience in steps 1 through 3 pays you back in years.
What does the job cost, and how long does it last?
Expect these numbers to guide your budget:
- Pro pricing: the typical range is $5 to $15 per linear foot, covering labor, prep and cleanup.
- What pushes the price up: deep joints, primer and immersion needs, color matching, and difficult removal of old material.
- DIY math: for a pool with a perimeter of around 100 feet, you’re buying sealant, backer rod and consumables like tape, cleaner and blades. Price your own materials locally, then compare that total with a contractor quote that includes labor and disposal.
- Time: you can often apply everything in one day, but cure time can add 24 to 72 hours or more, and cool or humid weather stretches it further.
- Lifespan: one to five years is common. Higher-performance products and correct joint design push you toward the long end.
Budget anchor: Professional replacement runs $5 to $15 per linear foot, and owner reports suggest checking your mastic monthly so you catch failures early.
When should you call a pool professional?
Skip the DIY route and bring in a contractor when you see any of these:
- Structural movement or a heaved deck
- Active water leaks that return after resealing
- Delamination under the plaster, which often pushes the job past simple mastic replacement
- Joints that sit in continuous immersion
- A previous repair that failed or was done poorly
A good pro checks substrate soundness, tests adhesion, decides whether priming or resurfacing is needed, and confirms the right joint depth and backer rod. The quote should spell out removal, surface prep, primer, a high-performance sealant, color or texture work, and any warranty or follow-up. For bigger crack problems, our concrete crack repair and sealing page explains how we approach them, and our blog on pool crack repair methods shows where the DIY line sits.
Why a conservative call usually wins
I’ve watched the same two mistakes sink DIY mastic jobs: rushing the prep and grabbing the wrong product. A bead applied over a poorly prepared joint may look fine at first, then lose adhesion. When you’re unsure whether the joint is just worn or the deck is moving, treat that doubt as your answer and get it looked at before you spend a weekend on it. Our team has remodeled many pools over the years, and that experience is here if you want a second opinion.
— Brian
Let us handle the joints and the deck beneath them
When the problem goes deeper than a bead of sealant, we step in. We offer pool repair, concrete pool repair and pool resurfacing, including professional joint replacement and deck preparation, so the fix lasts instead of just looking good. We’ve spent years transforming pools across the Greater Phoenix area. If you’ve spotted structural signs, request an inspection and quote from us today.

FAQ
How much does it cost to replace pool mastic?
Professionals typically charge $5 to $15 per linear foot. Joint depth, primer needs, color matching and the difficulty of removing old material move the price within that range.
What is the purpose of pool mastic?
Pool mastic seals the joint between the coping and the deck. It is intended to seal the joint between the coping and the deck.
What is the best sealant for pool leaks?
For deck expansion joints, a self-leveling or semi-self-leveling polyurethane such as Vulkem 45SSL is a common choice. For active leaks in concrete, a hydraulic cement is the usual fix, and a persistent leak is worth a professional look.
Where can I buy pool mastic?
Pool supply stores and home improvement retailers sell it, and manufacturers’ product data sheets list suitable options. Confirm the product is rated for horizontal, traffic-bearing pool deck joints before you buy.
Sources
- How to Replace Pool Mastic – Pool Research
- One-Part, Semi-Self-Leveling SealantVulkem ® 45SSL
- Sikaflex® SL 1
- How to Fix a Cracked Pool Deck