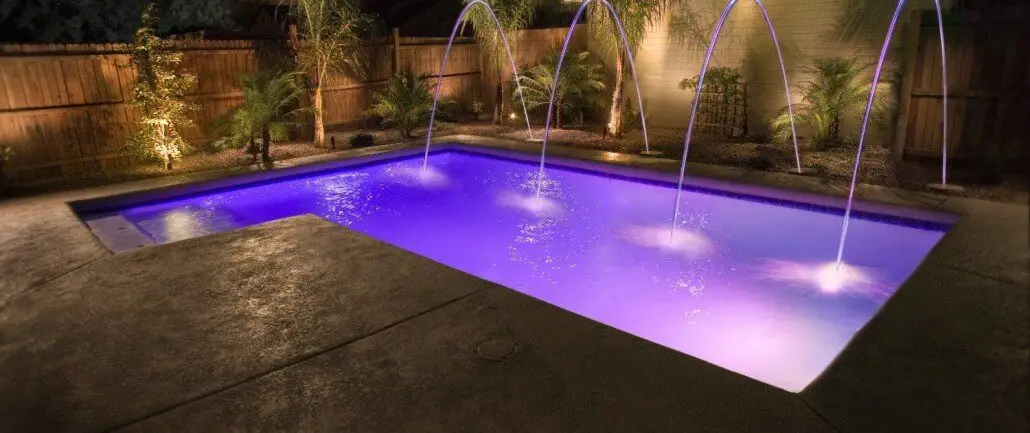
Pool resurfacing is defined as the process of removing or profiling a pool’s worn interior finish and applying a new surface layer to restore appearance, safety, and structural integrity. The industry term for this work is pool refinishing, and replastering is one specific type within that broader category. Whether your pool shows rough texture, peeling plaster, or stubborn stains, understanding the full resurfacing process helps you plan the project, set realistic expectations, and protect your investment for years to come. This guide walks you through every stage, from draining to startup water chemistry.
What does the pool resurfacing process explained look like step by step?
Pool resurfacing replaces the interior finish entirely, rather than patching isolated spots. That distinction matters because a patch repair on a failing surface only delays the inevitable. A full refinishing job addresses the root cause and gives the shell a fresh, durable bond.
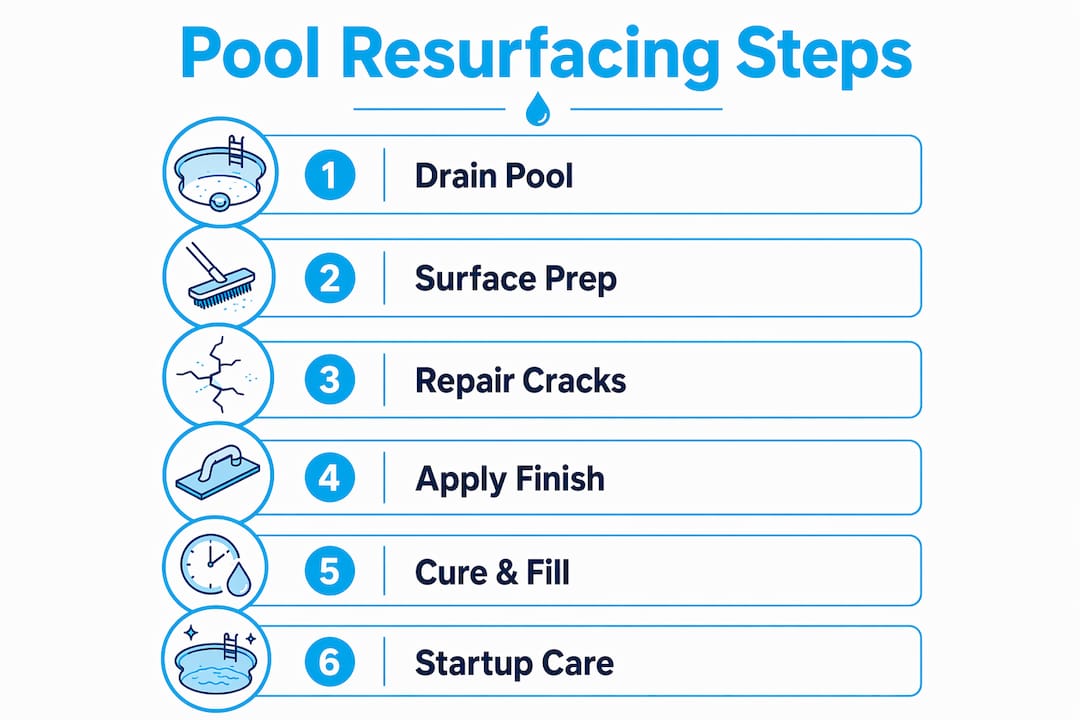
A typical residential gunite pool resurfacing project follows this sequence:
- Drain the pool. The pool is pumped down completely. Hydrostatic relief plugs are opened to prevent groundwater pressure from cracking the empty shell. This phase takes 1–3 days.
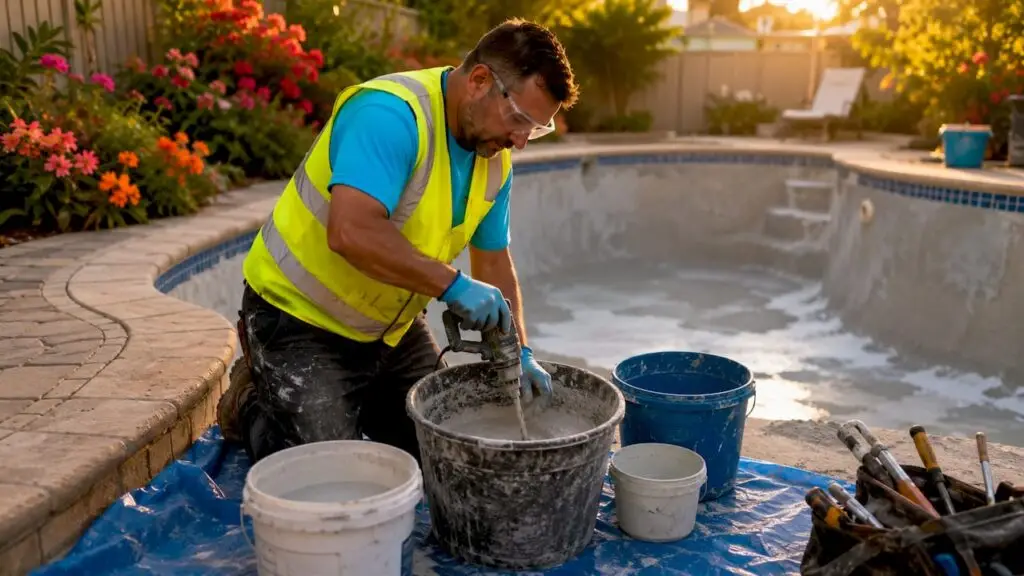
- Profile the old surface. Crews use sandblasting or hydroblasting to remove the existing finish and expose the substrate. This step creates the mechanical profile the new finish needs to bond securely.
- Inspect and repair the shell. Once the old surface is stripped, structural cracks, hollow spots, and corroded fittings become visible. Structural repairs must happen before any new finish goes on. Skipping this step causes delamination and premature failure.
- Apply the bond coat. A bonding agent is troweled or sprayed onto the prepared shell. This layer chemically links the old gunite to the new finish material.
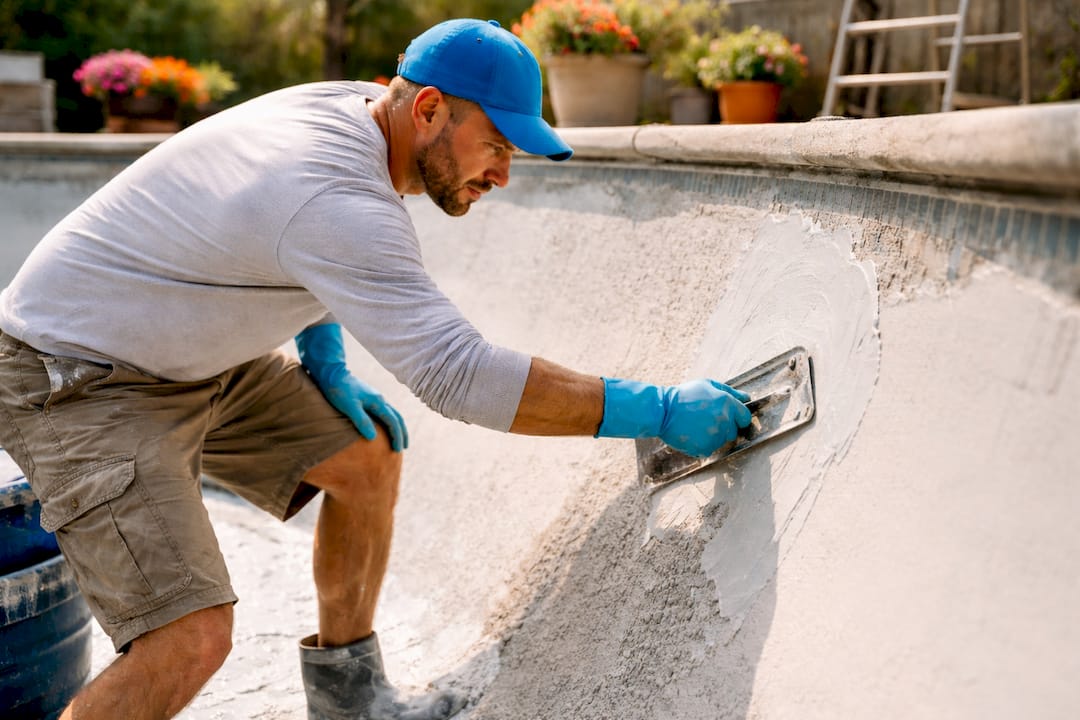
- Apply the new finish. Crews trowel the chosen surface material, whether plaster, quartz aggregate, or pebble, in even passes. This phase typically takes 1–2 days.
- Fill the pool and begin startup. Water filling starts immediately after the finish is applied to prevent the new surface from drying out unevenly. Filling and initial curing take 2–5 days or more.
A typical project runs 5–14 days from drain to swim-ready, depending on pool size, repair scope, and weather. Phoenix summers can accelerate drying but also stress fresh plaster if filling is delayed.
Pro Tip: Schedule resurfacing in spring or fall in the Greater Phoenix area. Extreme summer heat can cause fresh plaster to dry too fast at the edges before crews finish troweling, which leads to cracking.
What finish materials are available for pool resurfacing?
The finish you choose affects cost, lifespan, maintenance, and how the pool looks and feels underfoot. Three material categories dominate residential resurfacing projects.
Marcite plaster
Marcite is white Portland cement mixed with marble dust. It is the most affordable option and has been the industry standard for decades. The drawbacks are real: plaster lasts 7–12 years and is porous, meaning it absorbs chemicals more readily and stains faster than denser materials. Colored plaster adds pigment but does not change the porosity.
Quartz and stone aggregate finishes
Quartz aggregate blends crushed quartz crystals into a plaster base. The result is a harder, denser surface that resists staining and holds up better to chemical fluctuations. Aggregate finishes last longer than standard plaster and reduce the frequency of resurfacing cycles over a pool’s life. The upfront cost is higher, but the total cost of ownership over 15–20 years is often lower.
Glass bead and pebble finishes
Glass bead surfaces use small recycled glass beads for a shimmering, luxury appearance. Pebble finishes embed small river stones into the plaster matrix for a natural, textured look. Both options sit at the premium end of the price range and offer the longest lifespans of any residential finish category.
Here is a quick comparison to help you weigh your options:
| Finish type | Typical lifespan | Stain resistance | Relative cost |
|---|---|---|---|
| Marcite plaster | 7–12 years | Low | $ |
| Quartz aggregate | 15–20 years | High | $$ |
| Glass bead | 15–25 years | High | $$$ |
| Pebble | 20–25 years | Very high | $$$ |
Key factors that should drive your material choice:
- Budget. Plaster costs less upfront but requires more frequent replacement.
- Climate. Phoenix pools face intense UV and heat. Denser aggregates hold color and texture better under those conditions.
- Desired look. Glass bead and pebble finishes create a resort-style appearance that plaster cannot replicate.
- Maintenance tolerance. Plaster demands tighter water chemistry management. Aggregates are more forgiving but still require monitoring.
How should homeowners prepare for a resurfacing project?
Preparation on your end makes the contractor’s job smoother and protects your property during the work. Start by identifying visible wear signs before calling a contractor. Rough, sandpaper-like texture underfoot, peeling or flaking plaster, spreading stains that do not respond to chemical treatment, and visible cracks are the clearest signals that resurfacing is overdue. Catching these signs early prevents water migration into the shell, which causes far more expensive structural damage.
Once you have scheduled the project, plan for these practical realities:
- Pool downtime. Your pool will be out of service for at least 5–14 days. Plan around family schedules and avoid booking resurfacing during peak summer use.
- Equipment protection. Pumps, filters, and heaters need to be protected or temporarily disconnected. Confirm with your contractor who handles this. If your heater needs service before or after the project, coordinating with a pool heater service provider in advance prevents delays.
- Access clearance. Crews need clear access to the pool deck and equipment pad. Move furniture, planters, and any obstacles at least 48 hours before work begins.
- Tile and coping decisions. Resurfacing is the ideal time to replace waterline tile or coping. Bundling these tasks saves labor cost and avoids disrupting a freshly finished surface later.
- Contractor communication. Ask for a written project schedule and a startup protocol document before work begins. Verbal agreements on timelines and chemistry management are not enough.
Pro Tip: If you plan to repair your pool before a property sale, schedule resurfacing at least 6 weeks before listing. This gives the surface time to fully cure and the water chemistry time to stabilize, so the pool photographs well and passes inspection.
Why does post-resurfacing water chemistry management matter so much?
The first 28 days after a new plaster finish is applied are the most critical period in the entire resurfacing process. Balanced water chemistry during startup prevents scaling, etching, and permanent staining that can ruin a brand-new surface before you ever swim in it.
Follow this startup sequence carefully:
- Begin filling immediately. Do not let fresh plaster sit dry. Start filling as soon as the finish crew leaves.
- Test water chemistry within 24 hours of filling. Target pH between 7.4 and 7.6, total alkalinity between 80 and 120 ppm, and calcium hardness between 200 and 400 ppm.
- Brush the entire pool surface daily for the first two weeks. Daily brushing removes plaster dust that rises to the surface as the finish cures. If this dust settles and is not removed, it causes roughness and gray staining.
- Avoid running the pool cleaner for the first 30 days. Automatic cleaners can scratch fresh plaster before it fully hardens.
- Delay swimming for 7–10 days after filling. The surface needs time to harden before foot traffic.
“Most early surface problems are caused by improper water chemistry, emphasizing homeowner involvement during startup care.” — Grey Shark Pools
Written startup protocols aligned with NPC guidelines are the industry standard for preventing common startup errors. The National Plasterers Council publishes startup procedures that reputable contractors follow. Ask your contractor to provide their written protocol before the project starts.
Plaster finishes are more sensitive to calcium hardness and pH swings than aggregate finishes. Aggregate surfaces tolerate more variability but still require daily monitoring during the first month. Do not assume a premium finish means you can skip the startup routine.
Key Takeaways
Proper surface preparation, the right finish material, and disciplined post-resurfacing water chemistry management are the three factors that determine how long a new pool finish lasts.
| Point | Details |
|---|---|
| Resurfacing vs. replastering | Resurfacing is the broader process; replastering is one specific type that applies fresh plaster. |
| Project timeline | Most residential projects take 5–14 days from draining to swim-ready. |
| Finish lifespan | Plaster lasts 7–12 years; quartz and pebble finishes last 15–25 years with proper care. |
| Startup chemistry | Maintain pH, alkalinity, and calcium hardness daily for 28 days to protect the new surface. |
| Surface prep is non-negotiable | Skipping bond coat application or structural repairs leads to delamination and early finish failure. |
What most homeowners get wrong about resurfacing
After working on hundreds of pool transformations across the Greater Phoenix area, I can tell you the biggest mistake homeowners make is treating resurfacing as a purely cosmetic project. It is not. A worn plaster surface allows water to migrate into the gunite shell beneath it. Over time, that moisture causes rebar corrosion, spalling, and structural damage that costs far more to fix than a timely resurface would have.
The second most common mistake is neglecting the startup period. Homeowners spend thousands on a beautiful new pebble finish and then hand the chemistry management entirely to a weekly pool service that visits once every seven days. That is not enough during the first 28 days. You need daily brushing and daily testing for at least the first two weeks. No contractor or service company can substitute for your own involvement during that window.
I also see homeowners skip the written startup protocol conversation with their contractor. Get it in writing before the project starts. Know exactly what pH, alkalinity, and calcium hardness targets your contractor recommends for your specific finish type. If something goes wrong with the surface in month two, that document is your reference point for diagnosing the cause.
The pools that look great five years after resurfacing are almost always the ones where the homeowner stayed engaged during startup, not just during the sales process.
— Brian
Wefixuglypools brings expert resurfacing to the Greater Phoenix area
Wefixuglypools has spent a decade transforming worn, unsafe pools into clean, beautiful backyard spaces across Phoenix and the surrounding communities. Our team specializes in every stage of the resurfacing process, from structural shell repairs and bond coat application to premium finish installation and written startup protocols.
Whether you are choosing between quartz aggregate and pebble finishes or need a full pool remodeling and restoration that includes new tile, coping, and water features, we build a plan around your pool, your budget, and your timeline. Homeowners across Scottsdale, Surprise, and North Phoenix trust Wefixuglypools because we treat every project as a long-term investment, not a quick patch job. Contact us today for a consultation and get a clear picture of what your pool can become.
FAQ
What is the difference between pool resurfacing and replastering?
Pool resurfacing is the broader process of removing the old interior finish and applying any new surface material, including plaster, quartz, or pebble. Replastering is a specific type of resurfacing that applies fresh plaster as the new finish.
How long does pool resurfacing take?
Most residential gunite pool resurfacing projects take 5–14 days from draining to swim-ready, depending on pool size, the extent of repairs needed, and weather conditions.
What are the signs that a pool needs resurfacing?
Rough or sandpaper-like texture underfoot, peeling or flaking plaster, spreading stains that do not respond to chemicals, and visible cracks are the clearest signs that resurfacing is overdue.
How soon can you swim after pool resurfacing?
Most contractors recommend waiting 7–10 days after filling before swimming, with full startup water chemistry management continuing for 28 days to protect the new surface.
Does pool resurfacing add value before selling a home?
A freshly resurfaced pool improves both the appearance and the safety inspection results of a property. Scheduling resurfacing at least 6 weeks before listing gives the surface time to fully cure and the water to stabilize before buyer walkthroughs.